Default Reasoning

Construction of sensible guesses when some useful information is lacking and no contradictory evidence is present…

  • Subscribe

  • Disclaimer

    This blog is personal. The views and opinions expressed here represent my own and not those of the people, institutions or organizations that I may or may not be related with unless stated explicitly. All blog post, white papers and manuals were written during the projects, mostly at a customer site and are scenario specific. Use at your own risk.
  • Meta

Archive for the ‘ESXi 4’ Category

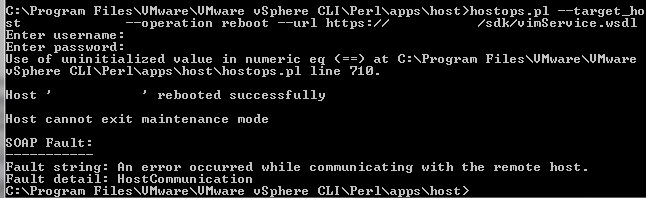
How to: Backup and restore ESXi configuration using vMA

Posted by Marek.Z on 23 April 2012

A quick blog post about backing up and restoring the configuration of your ESXi hosts. It will shorten your recovery time when something goes wrong during an upgrade or in case of hardware failure and you want to restore the configuration of your ESXi hosts as soon as possible. Here are the steps to perform a back-up and restore of your ESXi host.

Backup

  1. SSH or login to the vMA.
  2. Add the host as target to the vMA: vifp addserver <FQDN or IP Address>
  3. Enter the password.
  4. Set the server as target: vifptarget -s <FQDN or IP Address> Notice that your prompt will reflect the FQDN or IP address of the host.
  5. Save the configuration with: vicfg-cfgbackup -s /tmp/<Config_File_Name>
  6. Done, the config has been saved in the tmp directory of the vMA.

Restore

  1. Add the host and set it as target in the vMA, just like in step 1 to 3 in the back-up procedure.
  2. Restore the configuration with: vicfg-cfgbackup -f -l /tmp/<Config_File_Name>
  3. Type Yes to start the restore procedure.
  4. When the procedure is finished, the host will reboot with the new settings.

Done!

Cheers!

- Marek.Z

Posted in ESXi 4, ESXi 5, vMA, VMware | Tagged: , , , , | Leave a Comment »

Troubleshooting IP-Hash load balancing on a NFS storage network.

Posted by Marek.Z on 24 January 2012

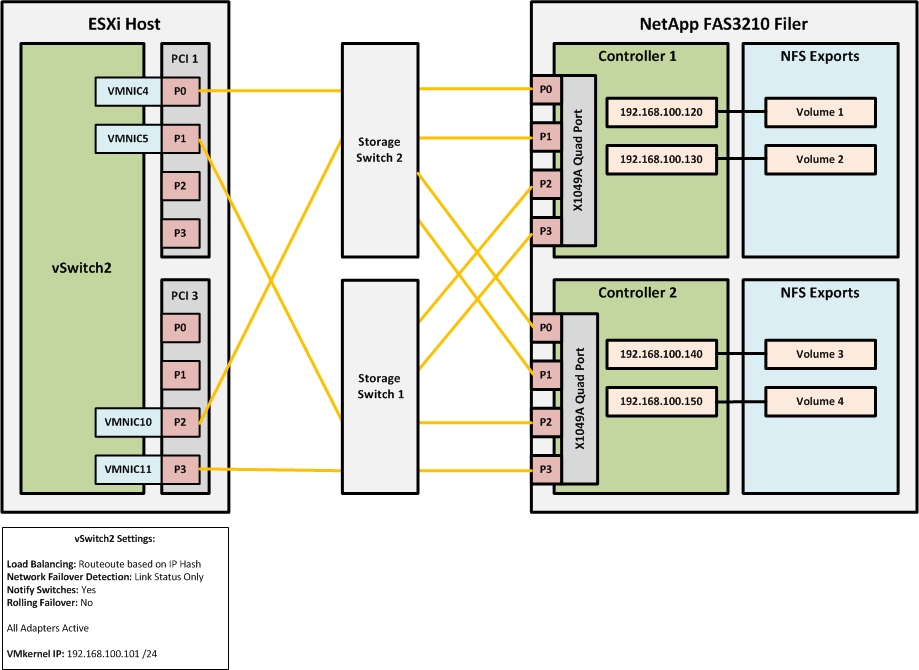
When configuring a NFS storage network at one of our customers some time ago, I noticed that the ESXi host wasn’t utilizing all NICs assigned to the NIC team for the VMkernel traffic. After some research, I have found this article written by Frank Denneman a while ago and this VMware KB document. According to the blog post and the article mentioned above, this issue may occur if the calculated hash returns the same result based on the source IP and both destination IP’s. Before we jump in to troubleshooting, let’s take a look at what is exactly going wrong.

Setup

The setup consisted of 4 Dell R710 ESXi hosts connected through 2 stacked Cisco 2960 switches to a NetApp FAS3210 filer. Four NICs per server have been dedicated to NFS storage and cabled in a redundant configuration (2 per switch in EtherChannel). See the drawing for more details.

Solution

To see what is going wrong, we need to calculate the IP-Hash manually. The formula is:

Source IP XOR Destination IP = x MOD y = z where:

Source IP = VMkernel IP address in Hexadecimal
Destination IP = IP address of the NFS filer in Hexadecimal
x = Exclusive OR operation output
y = Number of physical NICs
z = Modulo operation output

First, let’s calculate the IP-Hash value of the IP addresses in the current setup. To do this, we need to convert the IP addresses from decimal to hexadecimal. I used the BitCricket IP Calculator to do the conversion.

Next, calculate the IP-Hash with the formula specified earlier and take a look at the outcome. You can use Windows Calculator to do this, just set the view to Programmer and make sure it is set to Hex and Qword.

1.    C0A86465 XOR C0A86478 = 1D MOD 4 = 1
2.    C0A86465 XOR C0A86482 = E7 MOD 4 = 3
3.    C0A86465 XOR C0A8648C = E9 MOD 4 = 1
4.    C0A86465 XOR C0A86496 = F3 MOD 4 = 3

As you can see, the values are not unique. That’s what causes the problem. The IP-Hash calculation only returns 2 different values instead of 4. To correct this, we need to reconfigure the destination IP addresses (on the NFS Filer) so that every IP-Hash calculations return a unique value. The IP addresses have been reconfigured as follow:

Let’s have a look at the IP-Hash calculations now.

1.    C0A86465 XOR C0A8646F = A MOD 4 = 2
2.    C0A86465 XOR C0A86470 = 15 MOD 4 = 1
3.    C0A86465 XOR C0A86471 = 14 MOD 4 = 0
4.    C0A86465 XOR C0A86472 = 17 MOD 4 = 3

As you can see, the IP-Hash calculation now returns unique values in all four cases. This will now allow utilization of all four NICs from the ESXi host to the NFS Filer.

Cheers!

- Marek.Z

Posted in ESXi 4, NetApp, NFS, Storage, VMware | Tagged: , , | 1 Comment »

Install Dell OpenManage on ESXi 4.1 using vSphere CLI or vMA.

Posted by Marek.Z on 9 May 2011

Here is a quick step-by-step guide on how to install the Dell OpenManage software on an ESXi host using the VMware vSphere Command Line interface (vSphere CLI) or the VMware vSphere Management Assistant (vMA). After the installation you’ll have to enable the CIM OEM provider so you can manage the host with Dell OpenManage Server Administrator. Before you begin make sure you have the following:

  • VMware vSphere CLI installed on your system or
  • VMware vMA up and running
  • Downloaded Dell OpenManage software bundle for ESXi
  • VMware vSphere Client (optional)

Ready? Go!

Part 1: Installing the software and enabling the CIM OEM provider using the vSphere CLI

  1. First, put the ESXi host in the maintenance mode through the vCenter Server using the GUI or with vSphere CLI by typing the following command. Make sure you execute the command from the “C:\Program Files\VMware\VMware vSphere CLI\Perl\apps\host” directory. Type: C:\>…\hostops.pl --target_host --operation enter_maintenance --url https:///sdk/vimService.wsdl
  2. Provide the vCenter Server credentials.
  3. If successful, you will see “Host <hostname> entered maintenance mode successfully” message.
  4. Next, install the software by typing: C:\Program Files\VMware\VMware vSphere CLI>vihostupdate.pl --server <FQDN_ESXi_Host> -i -b D:\…\OM-SrvAdmin-Dell-Web-6.5.0-2247.VIB-ESX41i_A01
  5. Enter the root username and password of the host and press Enter.
  6. Wait until the installation is finished. You will see the following message:.
  7. Reboot the host by typing: C:\>…\hostops.pl --target_host <FQDN_ESXi_Host > --operation reboot --url https:///sdk/vimService.wsdl
  8. The installation part is finished. Next, enable the CIM OEM provider on the host.
  9. Enter the following command: C:\>…\ vicfg-advcfg.pl --server --set 1 UserVars.CIMoemProviderEnabled
  10. Enter the root credentials and press Enter.
  11. Reboot the host.
  12. Wait until the host is back online and exit the maintenance mode by typing: C:\>…\hostops.pl --target_host --operation enter_maintenance --url https:///sdk/vimService.wsdl
  13. Enter the vCenter Server credentials and press Enter.
  14. Done! :)

Part 2: Installing the software and enabling the CIM OEM provider using the vMA

  1. First, copy the downloaded Dell OpenManage software to a directory on the vMA. In my case, I created a directory called /Software/DellOpenManage under the /home/vi-admin directory.
  2. Login directly or through SSH to the vMA.
  3. First, add the ESXi host to the vMA: [vi-admin@vMA/]$ vifp addserver <FQDN_ESXi_Host>
  4. Provide the root password for the ESXi host and press Enter.
  5. Set the ESXi host as the target for this session: [vi-admin@vMA/]$ vifptarget –set (Tip: Hit the Tab button for a list of known servers)
  6. Place the host in the maintenance mode by typing: [vi-admin@vMA/][Server_Name]$ vicfg-hostops -o enter
  7. Wait untill the hosts enter the maintenance mode and install the software by typing: [vi-admin@vMA/][Server_Name]$ vihostupdate –i –b /home/vi-admin/Software/DellOpenManage/
  8. Wait until the software is installed and reboot the server by typing: [vi-admin@vMA/][Server_Name]$ vicfg-hostops –o reboot
  9. After the reboot, enable the CIM OEM provider by typing: [vi-admin@vMA/][Server_Name]$ vicfg-advcfg –s 1 UserVars.CIMoemProviderEnable
  10. Reboot the server once again.
  11. Done! :)

Alternatively, you can enable the CIM OEM provider using the vSphere Client after the software installation and reboot of the host:

  1. Select the host in the vCenter Server navigate to Configuration -> Software -> Advanced Settings.
  2. Click on UserVars in the left panel and change the value of the CIMoemProviderEnabled field to 1. Click OK.
  3. Restart the ESXi host.
  4. Wait untill the host is back online, exit the maintenance mode and you’re done :)

Cheers!

- Marek.Z

Posted in Dell, ESXi 4, OpenManage, VMware | 12 Comments »

Dell PowerEdge R710 BIOS settings for VMware vSphere 4.x.

Posted by Marek.Z on 14 April 2011

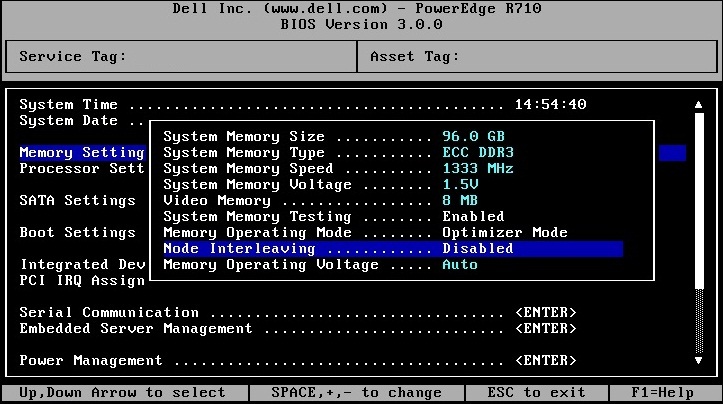
Recently, I was involved in a big infrastructure refreshment project for one of our customers across different locations in Europe. The old hosts were replaced with the brand new Dell PowerEdge R710 hosts with Intel X5650 processor and 96 GB of memory. All hosts were installed with the vSphere Hypervisor (ESXi). Here are some best practice BIOS settings that we used during the project.

Power on the server and press F2 during the initialization process to enter the BIOS and let’s start with:

Memory Settings:

  • Set Node Interleaving to Disabled

Processor Settings:

  • Set Virtualization Technology to Enabled
  • Set Turbo Mode to Enabled
  • Set C1E to Disable

Integrated Devices:

  • Set the Embedded NIC1 to Enabled without PXE

Serial Communication:

  • Set Serial Communication to Off
  • Set Redirection After Boot to Disabled

Power Management:

  • Set for Maximum Performance

Save the settings and reboot the server. You can now start the installation of the VMware vSphere Hypervisor :)

Cheers!

- Marek.Z

Posted in Dell, ESXi 4, PowerEdge, VMware, vSphere | 15 Comments »

Boot ESX 4 from SAN on a failover LUN – Lessons learned.

Posted by Marek.Z on 7 September 2010

Is it possible to boot an ESX 4 host from a LUN that has been “failed over” to another physical location? Yes, it is possible but there are some serious caveats by doing this. Please consider the following scenario:

  • 2 datacenters: site A production (active), site B failover (passive)
  • In each site an identical SAN array; LUN mirroring between the 2 arrays through a dedicated Fiber Channel link
  • In each site 2 identical ESX hosts and both hosts boot from the SAN array
  • The vCenter Server is virtualized

After the ESX boot LUN’s have been migrated to site B and you want to boot an ESX host from the migrated LUN, the boot process will probably stop at the vsd-mount and the ESX host will fall back into the troubleshooting mode. This is because the ESX host recognizes the boot LUN as a snapshot. This issue can be solved as described in the VMware KB 1012142 article. So, let’s get started :)

  1. In the troubleshooting mode, enable the resignature on the ESX host by typing: #esxcfg-advcfg –s 1 /LVM/EnableResignature
  2. Unload the VMFS driver: #vmkload_mod –u vmfs3
  3. Load the VMFS driver again: #vmkload_mod vmfs3
  4. Detect and resignature the VMFS volume by typing: #vmfstools –V
  5. Now, find the path to the esxconsole.vmdk file by typing: #find /vmfs/volumes/ -name esxconsole.vmdk
  6. The output should look similar to the following example:/vmfs/volumes/4c7e41bc-acb14e48-eeb9-e61f137cb50f/esxconsole-4c57f62f-72a6-8e68-1e35-e41f1378a8e0/esxconsole.vmdk
  7. Make a note of this output. You will need it later.
  8. Reboot the ESX host.
  9. Wait until the host boots up and you see the GRUB menu.
  10. Highlight the “VMware ESX 4.0” and press the “e” button.
  11. Select the “kernel /vmlinuz” section, press “e” button again and type the following after a space: /boot/cosvmdk=/esxconsole.vmdk. It should look similar to the following example: quiet /boot/cosvmdk=/vmfs/volumes/4c7e41bc-acb14e48-eeb9-e61f137cb50f/esxconsole-4c57f62f-72a6-8e68-1e35-e41f1378a8e0/esxconsole.vmdk
  12. Press Enter to accept the changes and press the “b” button to start the boot process. The ESX host should start successfully.
  13. Next, login at the service console with root user account and edit the esx.conf file located in the /etc/vmware directory: #vi /etc/vmware/esx.conf
  14. Press Insert key, scroll down to the /adv/Misc/CosCorefile entry and change the path to the one noted in step 6. It should look similar to: /adv/Misc/CosCorefile = “/vmfs/volumes/4c7e41bc-acb14e48-eeb9-e61f137cb50f/esxconsole-4c57f62f-72a6-8e68-1e35-e41f1378a8e0/core-dumps/cos-core”
  15. Scroll down to the /boot/cosvmdk entry and change the path to the one noted in step 6. The entry should read similar to: /boot/cosvmdk = “/vmfs/volumes/4c7e41bc-acb14e48-eeb9-e61f137cb50f/esxconsole-4c57f62f-72a6-8e68-1e35-e41f1378a8e0/esxconsole.vmdk”
  16. Press ESC key and type: :wq
  17. Press Enter key to save the changes to the esx.conf file.
  18. Save the changes made to the boot configuration by typing: #esxcfg-boot –b
  19. Reboot the ESX host.
  20. Repeat step 1 to 18 for every ESX host.

OK, the ESX part is done. The hosts should boot without any problems. Now, let’s try to bring the vCenter Server VM up and running.

  1. Login to one of the ESX hosts with the vSphere Client.
  2. Locate the vCenter Server on the datastore (if the datastore appears as a snapshot, simply rename it to the correct name).
  3. Add the vCenter Server VM to the inventory (if the vCenter Server has multiple disk drives located at different datastores, remove and re-add the disks to the vCenter Server VM).
  4. Check if the Network Adapter of the VM is connected to the correct network.
  5. Power on the VM.

Now that the virtual infrastructure is operational you can now restore the production VM’s. I’ve tested this procedure with 2 ESX hosts and 4 VM’s. It took me about 3 hours due to reboots and restore operations. Imagine doing this with 8 ESX hosts and 60 VM’s… you get the picture right? :)

Conclusion

Buy SRM! Or configure an Active/Active infrastructure.

Cheers!

- Marek.Z

Posted in ESXi 4, vCenter, VMware, vSphere | 6 Comments »

 
Follow

Get every new post delivered to your Inbox.

Join 424 other followers