

Here is a quick step-by-step guide on how to install the Dell OpenManage software on an ESXi host using the VMware vSphere Command Line interface (vSphere CLI) or the VMware vSphere Management Assistant (vMA). After the installation you’ll have to enable the CIM OEM provider so you can manage the host with Dell OpenManage Server Administrator. Before you begin make sure you have the following:
- VMware vSphere CLI installed on your system or
- VMware vMA up and running
- Downloaded Dell OpenManage software bundle for ESXi
- VMware vSphere Client (optional)
Ready? Go!
Installing the software and enabling the CIM OEM provider using the vSphere CLI
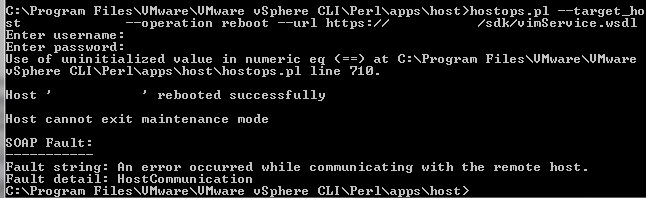
- First, put the ESXi host in the maintenance mode through the vCenter Server using the GUI or with vSphere CLI by typing the following command. Make sure you execute the command from the “C:Program FilesVMwareVMware vSphere CLIPerlappshost” directory. Type: C:>…hostops.pl
--target_host--operation enter_maintenance--url https:///sdk/vimService.wsdl - Provide the vCenter Server credentials.
- If successful, you will see “Host <hostname> entered maintenance mode successfully” message.
- Next, install the software by typing: C:\>Program FilesVMwareVMware vSphere CLI>vihostupdate.pl
--server <FQDN_ESXi_Host> -i -b D:…OM-SrvAdmin-Dell-Web-6.5.0-2247.VIB-ESX41i_A01
- Enter the root username and password of the host and press Enter.
- Wait until the installation is finished. You will see the following message:

- Reboot the host by typing: C:\>…hostops.pl
--target_host <FQDN_ESXi_Host >--operation reboot--url https:///sdk/vimService.wsdl
- The installation part is finished. Next, enable the CIM OEM provider on the host.
- Enter the following command: C:\>…vicfg-advcfg.pl
--server--set 1 UserVars.CIMoemProviderEnabled - Enter the root credentials and press Enter.

- Reboot the host.
- Wait until the host is back online and exit the maintenance mode by typing: C:\>…hostops.pl
--target_host--operation enter_maintenance--url https:///sdk/vimService.wsdl - Enter the vCenter Server credentials and press Enter.
- Done! 🙂


Installing the software and enabling the CIM OEM provider using the vMA
- First, copy the downloaded Dell OpenManage software to a directory on the vMA. In my case, I created a directory called /Software/DellOpenManage under the /home/vi-admin directory.
- Login directly or through SSH to the vMA.
- First, add the ESXi host to the vMA: [vi-admin@vMA/]$ vifp addserver <FQDN_ESXi_Host>
- Provide the root password for the ESXi host and press Enter.
- Set the ESXi host as the target for this session: [vi-admin@vMA/]$ vifptarget –set (Tip: Hit the Tab button for a list of known servers)
- Place the host in the maintenance mode by typing: [vi-admin@vMA/][Server_Name]$ vicfg-hostops -o enter
- Wait untill the hosts enter the maintenance mode and install the software by typing: [vi-admin@vMA/][Server_Name]$ vihostupdate –i –b /home/vi-admin/Software/DellOpenManage/
- Wait until the software is installed and reboot the server by typing: [vi-admin@vMA/][Server_Name]$ vicfg-hostops –o reboot
- After the reboot, enable the CIM OEM provider by typing: [vi-admin@vMA/][Server_Name]$ vicfg-advcfg –s 1 UserVars.CIMoemProviderEnable
- Reboot the server once again.
- Done! 🙂
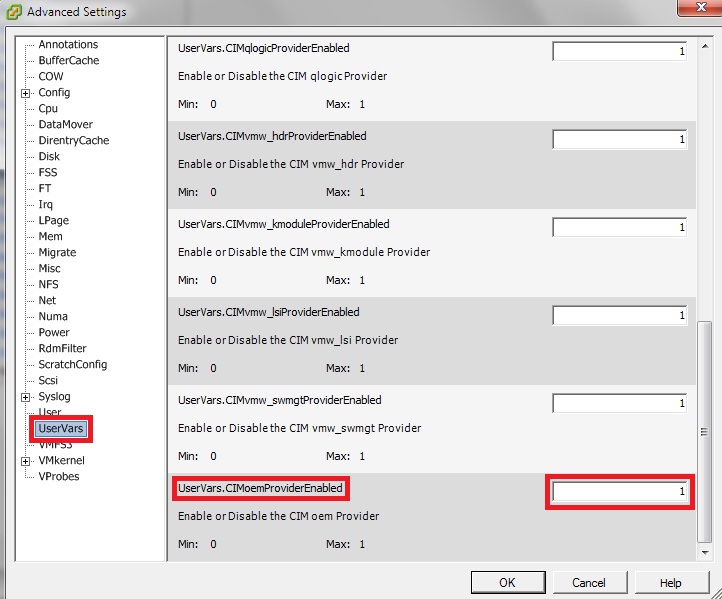
Alternatively, you can enable the CIM OEM provider using the vSphere Client after the software installation and reboot of the host:
- Select the host in the vCenter Server navigate to Configuration -> Software -> Advanced Settings.
- Click on UserVars in the left panel and change the value of the CIMoemProviderEnabled field to 1. Click OK.

- Restart the ESXi host.
- Wait untill the host is back online, exit the maintenance mode and you’re done! 🙂
Cheers!
– Marek.Z