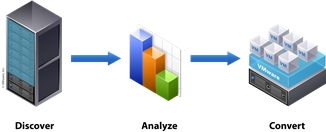
Default Reasoning

Construction of sensible guesses when some useful information is lacking and no contradictory evidence is present…

  • Subscribe

  • Disclaimer

    This blog is personal. The views and opinions expressed here represent my own and not those of the people, institutions or organizations that I may or may not be related with unless stated explicitly. All blog post, white papers and manuals were written during the projects, mostly at a customer site and are scenario specific. Use at your own risk.
  • Meta

Archive for the ‘P2V’ Category

Change the HAL from multiprocessor to uniprocessor on a Windows 2003 Virtual Machine.

Posted by Marek.Z on 8 July 2011


When performing a P2V or a V2V migration process, it’s a good opportunity to reduce the number of processors that the virtual machine will use. When you are migrating a multiprocessor server to a uniprocessor virtual machine, keep in mind that the HAL of the virtual machine needs to be changed from multi to uniprocessor. So, when the migration process is finished and the virtual machine is running, follow these steps to change the HAL from multiprocessor to uniprocessor.

  1. Login to the VM with the Administrator account.
  2. Open the device manager (devmgmt.msc).
  3. Select the processor and right-click to update the driver.
  4. In the Hardware Update Wizard, choose “No, not this time” and click Next.
  5. In the next window choose “Install from a list or specific location” and click Next.
  6. Select “Don’t search. I will choose the driver to install” ratio button and click Next.
  7. In the list with compatible hardware, select the Uniprocessor PC and click Next.
  8. When the wizard completes, click Finish to end the Hardware Update Wizard and restart your VM.
  9. Done.

Cheers!

- Marek.Z

Posted in P2V, VMware | 2 Comments »

Assign a static MAC Address to a Virtual Machine on VMware infrastructure.

Posted by Marek.Z on 9 June 2011

A few days ago I was P2V’ing some servers for a customer. The servers had application license bound to the MAC address of the NIC adapter so I had to change the auto-generated MAC address to a static one.

Follow these steps to change the MAC address from auto-generated to static.

  1. First, remove the VM from the vCenter Server inventory.
  2. Open the datastore containing the VM and download the .vmx file. Optionally, make a back-up copy of this file for safe keeping.
  3. Open the .vmx file (I use Notepad++) and modify the following entries:
  4. Change the ethernet0.addressType to static: ethernet0.addressType = “static”
  5. Add the following line: ethernet0.checkMACAddress = “FALSE”
  6. Change the ethernet0.generatedAddress line to: ethernet0.Address = “<00:AA:BB:CC:DD:EE>” (enter the old MAC address here)
  7. You should end up with something similar to this:
  8. Next, save the .vmx file and upload it back to the datastore. Overwrite the existing file.
  9. Add the VM back to the vCenter Server inventory and power on the VM.
  10. Done :)

You can verify the MAC address in the Windows VM by typing: C:\>ipconfig /all from the command prompt.

Cheers!

- Marek.Z

Posted in Converter, P2V, vCenter, VMware, vSphere | Leave a Comment »

P2V quick reference guide.

Posted by Marek.Z on 10 January 2011

I’ve been doing a lot of P2V’s for different customers lately and since most of the actions performed during the P2V procedure repeat themselves quite often, I’ve decided to create a quick reference guide for the P2V migrations. The steps described below are based on the Windows machines from different vendors. Let me know if you know any other steps that I should add to this list.

Pre-P2V actions

1.  Create a P2V impact analysis report for management and/or IT staff per machine that will be P2V’ed. Include at least the following information in your report:

a.  Impact and risks of the P2V procedure

b.  Generic approach to the P2V action

c.  Conditions and assumptions that may apply

d.  Relations with other projects or change requests

e.  Expected downtime, planning and communication plan

2.  Check event viewer for warnings and errors.
3.  Perform disk clean-up on all hard disks and defragment the disk if necessary.
4.  Check if there are some static routes configured on the NIC’s. Export if necessary.
5.  Start the P2V migration.

Post-P2V actions

1.  Do not power on the VM after the P2V conversion is completed. Edit VM properties:

a.  Remove unnecessary virtual hardware

b.  Check that the NIC is connected to the right network

c.  Force boot to BIOS

d.  Power on the VM and set the following settings in the BIOS:

i.  BIOS password, if necessary

ii.  Disable FDD and the FDD controller

iii.  Disable all Serial and Parallel ports

iv.  Set HDD as the 1st boot device

v.  Save settings and exit BIOS

2.  Reboot the VM and wait for login screen
3.  After login, wait for installation of VMware tools and new hardware. If necessary, reboot the VM.
4.  Uninstall all unnecessary software (for example: Display drivers, NIC drivers, vendor hardware agents)
5.  Uninstall all unnecessary hidden devices:

a.  Open command prompt and type: C:\>set devmgr_show_nonpresent_devices=1

b.  Open the device manager: C:\>devmgmt.msc

c.  Show hidden devices via View menu -> Show hidden devices and uninstall the old hardware

6.  Check the IP address. If a new NIC have been added, it will be set to DHCP by default. Change the IP/DNS information of the VM to match the physical machine.
7.  Check partition alignment and realign the partitions if applicable.
8.  Stop unnecessary services and set the startup type to manual or disabled.
9.  Disable the Screensaver:

a.  On Windows XP/2003/2008, edit the following key: HKEY_USERS/.DEFAULT/Control Panel/Desktop/ScreenSaveActive=0

b.  For IO intensive VM’s like SQL Databases, disable updating of the Last Access Time stamp: C:\>fsutil behavior set disablelastaccess 1

10.  Verify that OS and applications are working correctly. If so, put the machine back to the production.
11.  End of the P2V procedure.

Cheers!

- Marek.Z

Posted in Converter, P2V, vCenter, VMware | Leave a Comment »

 
Follow

Get every new post delivered to your Inbox.

Join 428 other followers