Here is a quick post about configuring the vSphere Dump Collector for your ESXi hosts. I’m not going to cover the installation process because it is really simple and straightforward. You can install the Dump Collector as stand-alone instance or integrated with vCenter Server. If you choose the last option you will have to provide the IP address, port and log in credentials for the vCenter Server. After the installation, you can configure the Dump Collector using:
- Host Profiles or
- ESXCLI
And probably PowerCLI but I didn’t look it up yet! 🙂
Host Profiles
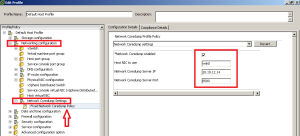
- Edit the host profile you want to configure or create a new one if you don’t have one.
- Navigate to Network Configuration –> Network Coredump Settings and select Fixed Network Coredump Policy.
- Make sure that the Network Coredump Collector is enabled, provide the Host NIC to use, Network Core Server IP and Network Coredump Server Port.

- Click OK to save the settings.
- Apply the profile to your hosts.
ESXCLI
- Open console session to your host or log in through the ESXi Shell.
- Log in as root user.
- Check the current configuration of coredump settings:#esxcli system coredump network get
- Configure the coredump with: #esxcli system coredump network set
--interface-name <VMkernel_Interface>--server-ipv4 <Server_IP_Address>--server-port 6500 - Enable the coredup by typing: #esxcli system coredump network set
--enable true - Verify that the coredump server is running (only available in ESXi 5.1): #esxcli system coredump network check
- You should see a message stating the following: “Verified the configured netdump server is running”.
- Log out from the host.
Note: mind the double dashes in the command syntax.
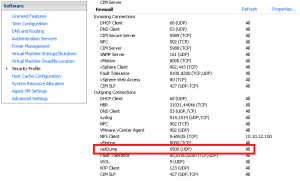
Check the firewall
Verify that the Dump Collector port is enabled in the ESXi firewall. 
Test
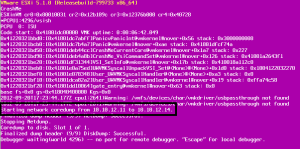
To test if your host will dump the PSOD data to your Dump Collector force a PSOD on your host.
- Log in to the host locally or remotely.
- Type: #vsish and press Enter
- Next, type: set /reliability/crashMe/Panic followed by Enter.
- This will cause a PSOD. Note that the dump is being send over the network.

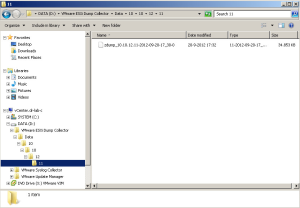
- Wait until the dump is ready. Navigate to the directory where the dumps are stored and you should see the dump file that was just created.

Cheers!
– Marek.Z
Very much useful..Many Thanks
Incredibly timely for a test scenario where I needed to induce a crash to generate a dump and no other Google searches were fruitful.
Thank you