Default Reasoning

Construction of sensible guesses when some useful information is lacking and no contradictory evidence is present…

  • Subscribe

  • Disclaimer

    This blog is personal. The views and opinions expressed here represent my own and not those of the people, institutions or organizations that I may or may not be related with unless stated explicitly. All blog post, white papers and manuals were written during the projects, mostly at a customer site and are scenario specific. Use at your own risk.
  • Meta

Posts Tagged ‘SRM 5’

Port requirements for Site Recovery Manager 5 and vCenter Server 5

Posted by Marek.Z on 6 August 2012

A few days ago Troy Hampel (@MrTroyH) asked me on Twitter if I had some troubleshooting blogs about resource mapping permission in Site Recovery Manager 5, unfortunately I didn’t, simply because I did not came across any issues with permissions when I was implementing my SRM 5 infrastructure :) But this gave me an idea to summarize the ports used by the Site Recovery Manager 5 between the Protected Site and the Recovery Site but also the local site communication.

vCenter Server

  • 80 – HTTP
  • 443 – SSL interface
  • 902 – VMware management
  • 8096 – Tomcat web server

vSphere Client

  • 8095 – SRM client plugin to communicate with SRM server and vCenter Server (local site)
  • 9007 – SRM client plugin to communicate with vCenter server (local site)

Site Recovery Manager Server

  • 80 – SRM Server at Protected Site to vCenter Server at Recovery Site. SRM communication with local vCenter server and vSphere Client plug-in download
  • 443 – SRM communication with remote vCenter Server via HTTP over SSL tunnel
  • 902 – VMware management, needs to be open between SRM server and ESX(i) hosts
  • 1433 – SRM Connectivity to Microsoft SQL Server (local site)
  • 1521 – SRM Connectivity to Oracle (local site)
  • 1526 – SRM Connectivity to Oracle (local site)
  • 5000 – SRM Connectivity to IBM DB/2 (local site)
  • 8095 – SOAP interface between the vCenter Server proxy and SRM
  • 8123 – SOAP port between SRM and vSphere Replication Management server (local site)
  • 9085 – HTTP interface for downloading the UI plugin and icons (local site)
  • 9007 – SOAP interface for external API clients via WSDL
  • 9008 – SOAP interface for external API clients via HTTP

vSphere Replication  Management Server

  • 80 – All traffic to SRM servers goes through the vCenter proxy
  • 8043 – SOAP interface between the vCenter proxy and VRMS
  • 8080 – VAMI Web UI for the VRMS appliance

vSphere Replication Server (if used)

  • 902 – VMware management (specifically the NFC service), needs to be open between VR server and ESX(i) hosts on the same site
  • 8123 – SOAP interface used by VRMS to manage VR servers (local site)
  • 5480 – VAMI Web UI for the VR server (local site)
  • 31031 – Initial replication traffic
  • 44046 – Ongoing replication traffic

Storage Replication Adapters (if used)

  • See vendor documentation

All ports are TCP. No UDP ports are used by SRM 5.

Source:

Cheers!

- Marek.Z

Posted in Site Recovery Manager, SRM 5, vCenter, VMware | Tagged: , , , , , | Leave a Comment »

How To: Upgrade VMware vCenter Site Recovery Manager 5.0 to version 5.0.1

Posted by Marek.Z on 11 June 2012

Here is a quick “how to” on upgrading the VMware vCenter Site Recovery Manager from version 5.0 to version 5.0.1. It is recommended that you perform an in-place upgrade rather than a new installation as this will preserve all reports, recovery plans, protection groups etc. The upgrade procedure must also be performed on the Recovery Site. Before you begin make sure the following criteria are met:

  • SRM database is backed up
  • The SRM software is downloaded from VMware
  • Read the release notes

The upgrade process is quite straightforward and contains the following steps:

  1. Upgrade the SRM software
  2. Reinstall the SRM vCenter plug-in
  3. Upgrade the VRM server (if applicable)
  4. Upgrade the VR server (if applicable)
  5. Repeat the process for the Recovery Site

Let’s start with upgrading the software at the Protected Site.

Software Upgrade

  1. Login to the vCenter Server on the Protected Site, locally or through RDP.
  2. Execute the VMware-srm-5.0.1-<Build_Number>.exe and click Yes when asked if you want to continue.
  3. On the Welcome screen, click Next to proceed.
  4. You will be presented with the following question: “It is highly recommended that the VMware vCenter Site Recovery Manager database is backed up before continuing with this upgrade. Has the database been backed up?” Answer Yes to proceed, otherwise backup the database first.
  5. The upgrade process will start. Wait until it is completed and click the Finish button to close the window.

Reinstall vCenter plug-in

  1. When still logged in on the vCenter Server at the Protected Site, open the VMware vSphere Client and connect to the vCenter Server.
  2. Go to the Plug-ins menu and select Manage Plug-ins.
  3. In the Plug-in Manager you should see that a new SRM Extension is available. Click on Download and Install to upgrade the plug-in.
  4. Install the certificate and click on Ignore in the security warning window.
  5. Click Run in the next window to start the upgrade process.
  6. Click Yes when asked if you want to continue.
  7. In the Welcome screen click on the Next button to continue.
  8. If you are presented with a message that some files are in use, select “Automatically close and attempt to restart application” option. Click OK to continue.
  9. Click Finish to close the window.

Upgrade VRM Server

Since I’m using vSphere Replication, I also need to update the VRM Server and the VR Server.

  1. Open you Internet browser and navigate to the https://VRM_Server_IP_Address:8080.
  2. Login with the root account to the appliance, select the Update tab and click Check Updates under the Actions menu on the left.
  3. Note that an update is available.
  4. Click Install Updates to start the update process.
  5. Click OK if asked “Are You sure you want to install updates?
  6. Wait until the update is installed.
  7. Logout from the appliance.

Upgrade VR Server

  1. With the Internet browser still open, go to https://VR_Server_IP_Address:5480.
  2. Login with the root account (default password is: vmware), select the Update tab and click Check Updates under the Actions menu on the left.
  3. When the new update is detected, click on Install Updates.
  4. Click OK if asked “Are You sure you want to install updates?
  5. Wait until the update is installed.
  6. Logout from the appliance.

Reminder: don’t forget to upgrade the Recovery Site as well!

The VMware vCenter Site Recovery Manager is now upgraded to version 5.0.1

Cheers!

- Marek.Z

Posted in Site Recovery Manager, SRM 5, vCenter, VMware | Tagged: , , , , , | 2 Comments »

How To: VMware Site Recovery Manager 5 – Part 10 (Final): Migration and Failover

Posted by Marek.Z on 4 June 2012

So far we covered almost any aspect of the VMware vCenter Site Recovery Manager. We have prepared and set up the infrastructure, paired the sites, configured the VR replication, set up inventory mappings, created a protection group, configured a recovery plan and performed a test failover. In this part we will perform a planned migration and an unplanned failover from the Protected Site to the Recovery Site to simulate a disaster recovery scenario. But first, let’s define both scenarios.

What is a planned migration?

“Planned migration enables you to migrate the workloads from the protected site to the recovery site with minimal risk of data loss. A planned migration will stop if there is an error in the workflow giving you an opportunity to fix it.”

What is an unplanned failover?

“Unplanned failover is a disaster recovery event where the connection between the sites has been lost. Unplanned failover will not stop if any errors are encountered in the workflow. This provides the quickest recovery time during a disaster event.”

Initiate Planned Migration

  1. Open the Site Recovery Manager on the Protected Site, click on the Recovery Plans in the left pane, select your recovery plan and click on the red Recovery button.
  2. Read the info in the Recovery Confirmation window, check the “I understand that this process will permanently alter the virtual machine and infrastructure of both the protected and recovery datacenters.” box and make sure that Planned Migration is selected under the Recovery Type. Click Next to continue.
  3. Review the info and click on Start to start the recovery process.
  4. Switch over to the Recovery Steps tab to see the progress.
  5. When the recovery process completes, you should see a message as depicted in the screenshot below.
  6. Notice that the VMs on the Protected Site are powered off and on the Recovery Site, powered on.

Initiate Unplanned Failover

This process is very similar to the one performed with the Planned Migration but in this case the Protection Site is not available.

  1. On the Protected Site, simulate a disaster by powering off the vCenter Server and the ESXi hosts containing the protected VMs.
  2. On the Recovery Site, open the Site Recovery Manager, navigate to Recovery Plans and press the red Recovery button, just like in the previous step.
  3. By now you should get a warning stating that the connection to the vCenter Server at the Protected Site has been lost.
  4. In the Recovery Confirmation window, notice that the Planned Migration is now grayed out. Select the “I understand that this process will permanently alter the virtual machine and infrastructure of both the protected and recovery datacenters.” option and click Next to proceed.
  5. Review the settings and press Start to begin the recovery process.
  6. Switch over to the Recovery Steps tab and monitor the progress. Notice the errors stating that the connection to the remote server is down. Despite the failure the recovery process continues. The VMs should be up and running in couple of minutes.

If the unplanned migration and failover process both complete successfully, your SRM implementation is properly configured. Congratulations! :)

This concludes the series about implementing and configuring the VMware vCenter Site Recovery Manager 5. I really like the product and I had a lot of fun building the lab, implementing and configuring SRM but also writing the blog posts. I hope you enjoyed the series as well.

Cheers!

- Marek.Z

Posted in Site Recovery Manager, SRM 5, vCenter, VMware | Tagged: , , , , , , , | 6 Comments »

How To: VMware Site Recovery Manager 5 – Part 9: Recovery Plans

Posted by Marek.Z on 4 June 2012

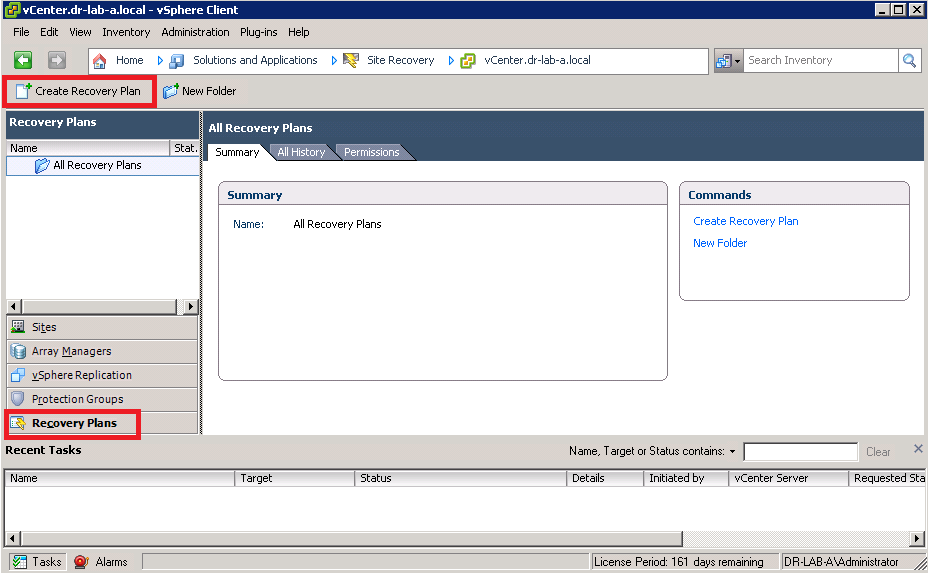
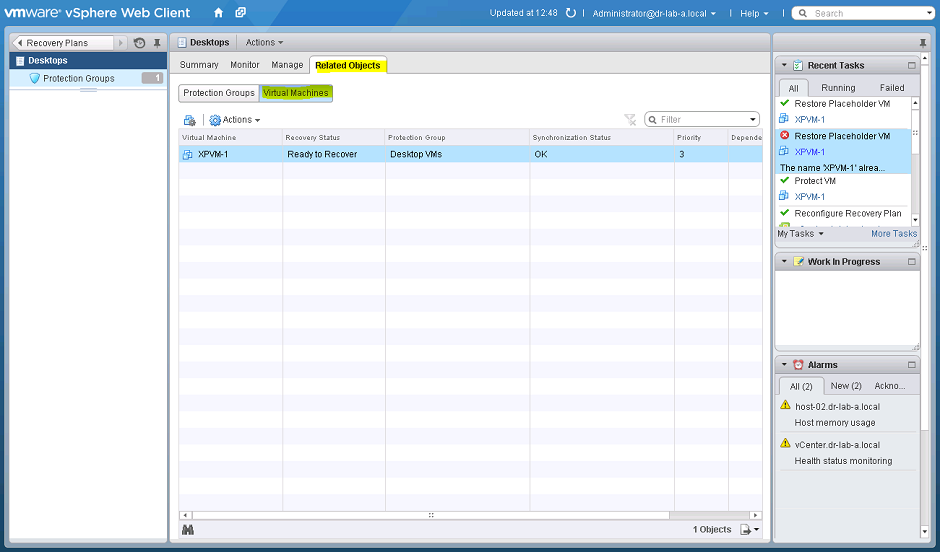
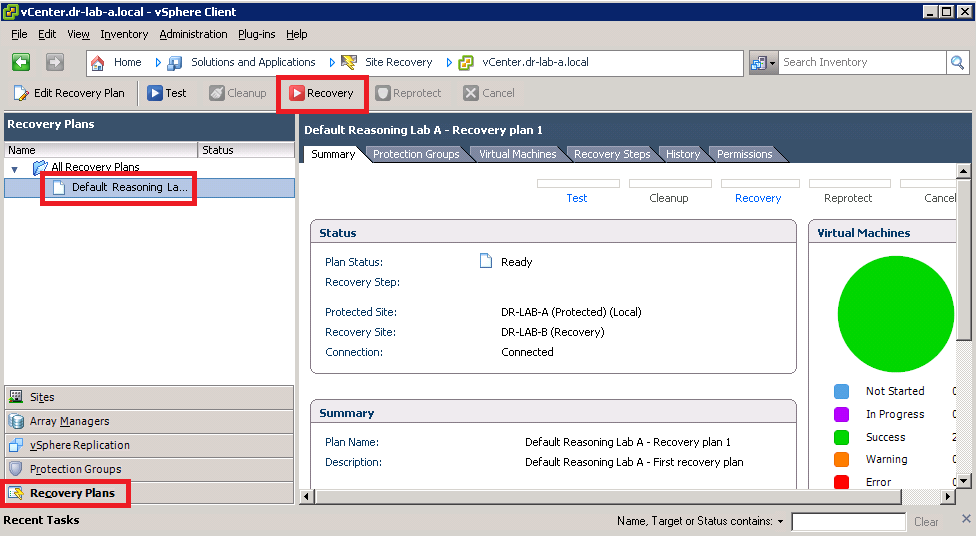
The protection group is now configured and the VMs are replicating to the Protected Site. The next step in the SRM deployment is to configure a recovery plan.

“A recovery plan is an automated plan for a full or partial disaster recovery failover.”

In other words, a recovery plan is like a runbook which is based on a protection group. The SRM recovery plan consists of the following:

  • List of protected VMs included in the protection group
  • Startup order for the VMs
  • Custom steps if applicable

A recovery plan for the Protected Site needs to be created at the Recovery Site. You can also create multiple recovery plans based on the disaster scenario. So, let us create a simple recovery plan for the VMs in the protection group configured in the previous part.

Configure Recovery Plan

  1. On the Protected Site, go to the Site Recovery Manager, select the Recovery Plans in the left pane and click on Create Recovery Plan.
  2. In the Create Recovery Plan wizard select the Recovery Site and click Next.
  3. Select the Protection Group created earlier and click Next.
  4. In the Test Network window, select the appropriate network at the Recovery Site. Choose the Auto setting to create a dedicated private network for testing purposes. You can also choose a network from the drop down menu if you have manually created a dedicated test network at the Recovery Site. In this case I’m going to leave it to the default Auto setting. Click Next to proceed.
  5. In the next window, provide a convenient name and description of the recovery plan and click Next.
  6. Review the settings and click Finish to close the wizard.

Modify Recovery Plan

Our basic recovery plan is now created, we can now configure some advanced features and properties of the recovery plan. These steps are not mandatory but take a look and play around with the settings to get a better understanding of the product.

  1. Select the recovery plan created in the previous step. Notice that the action bar above will now display some additional actions like Test, Cleanup, Recovery, Reprotect and Cancel.
  2. Select the Virtual Machines tab. Select a random VM and click Configure Recovery.
  3. In the properties window you can modify the settings for this particular VM like IP settings on the Protected Site and the Recovery Site, the priority group this VM belongs, dependencies of other VMs, shutdown actions, and startup actions, pre-power on steps and post-power on steps.
  4. Take a look at the recovery steps under the Recovery Steps tab en review the recovery steps that will be executed during a recovery. You can view the Test , Cleanup, Recovery and Reprotect steps from the View drop down menu.

Test Recovery Plan

Okay, so everything is set up for a test. Let’s give it a try.

  1. With the recovery plan still selected, click on the (blue) Test button on the action pane.
  2. Review the info provided by the test wizard. Uncheck the “Replicate recent changes to recovery site” and press the Next button. Note, in the real world scenario, leave the “Replicate recent changes to recovery site” option selected.
  3. Once again, review the info and press the Start button to start the failover test operation.
  4. To view the progress of the test, select the Recovery Steps tab.
  5. The test should complete successfully and the VMs should be up and running at the Recovery Site. The test is completed and you should see the following message as depicted in the screenshot.
  6. Great, the recovery plan runs without any errors. Now it’s time for a cleanup. :)
  7. Click on the Cleanup button in the action pane, read the cleanup information and press Next.
  8. Review the cleanup information and click Start to execute the cleanup process. Wait until the cleanup process completes. When it’s ready the status of the recovery plan should read Ready under the Summary tab.

OK, the basic recovery plan that we configured and modified in this part works without any errors. In the next part we will take a look at a planned migration and a failover process during a disaster recovery scenario. Click here to continue to part 10.

Cheers!

- Marek.Z

Posted in Site Recovery Manager, SRM 5, vCenter, VMware | Tagged: , , , , , | Leave a Comment »

How To: VMware Site Recovery Manager 5 – Part 8: Protection Groups

Posted by Marek.Z on 29 May 2012

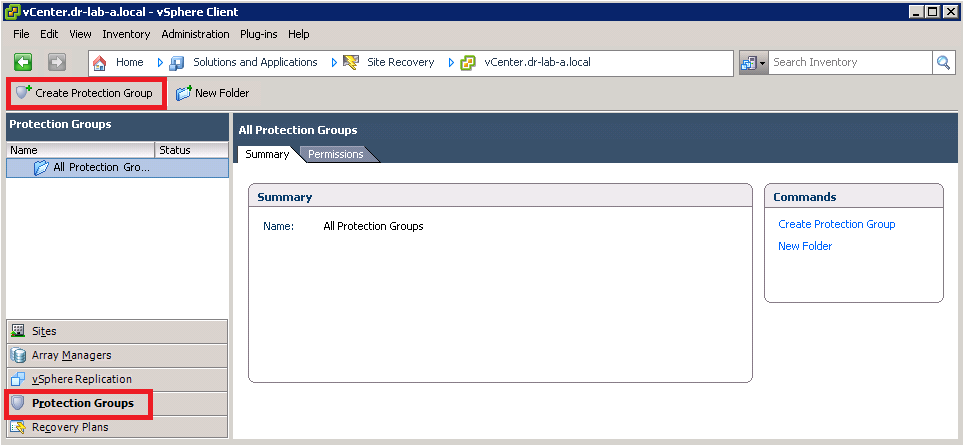
After configuring the replication of the virtual machines in SRM we can now create Protection Group(s). So what exactly is a protection group? Well, it’s quite self-explanatory :)

“A protection group is a group of virtual machines that fail over together to the recovery site during a test or a recovery procedure.”

The protection group can be used in one or multiple recovery plans which we will create later. Protection groups can be Array-based or VR-based. In this case we will create a protection group based on vSphere Replication since it was configured in the previous part.

Create Protection Group

  1. On the Protected Site, open the Site Recovery Manager and select Protection Groups in the left pane. Click on Create Protection Group to start the wizard.
  2. In the Create Protection Group wizard, select the Protected Site and vSphere Replication as the protection group type. Click Next.
  3. In the Select Virtual Machines window, select the VMs you want to add to this Protection Group and click Next.
  4. Provide a suggestive name and alternatively a description for this Protection Group and click Next.
  5. Review the settings and click on Finish when ready.
  6. Wait until the Protection Group is configured. You can monitor the progress in the task pane.

Now that the VMs are protected we can start building a recovery plan. Continue to part 9 where we will configure a recovery plan for our VMs.

Cheers!

- Marek.Z

Posted in Site Recovery Manager, SRM 5, vCenter, VMware | Tagged: , , , , , , | 2 Comments »

 
Follow

Get every new post delivered to your Inbox.

Join 424 other followers