So far the vCloud Suite proof of concept has been installed and configured with the vCloud Director with vCloud Networking and Security, vCloud Connector and vCenter Chargeback Manager. In this part we will take a look on how to proactively manage the health of vSphere infrastructure, virtual machines and applications. But also how to spot potential bottlenecks and how to remediate the problems. To do this, VMware offers vCenter Operations Manager, which is also part of the vCenter Operations Management Suite, to address these questions. Before we jump into installation and configuration of vCenter Operations Manager, let’s define what it actually is.
VMware vCenter Operations Manager is the key component of the vCenter Operations Management Suite. It provides a new and much simplified approach to operations management of vSphere, physical and cloud infrastructure. Using patented, self-learning analytics and an open, extensible platform, vCenter Operations Manager provides you with operations dashboards to gain deep insights and visibility into health, risk and efficiency of your infrastructure, performance management and capacity optimization capabilities.
Source: VMware vCenter Operations Manager Overview
Architecture
The vCenter Operations Manager is a virtual appliance and comes as an OVA downloadable from VMware. It can be deployed using the vSphere Client and the Web Client. Once deployed the vCenter Operations Manager is a vApp containing two virtual machines.
- UI VM: this virtual machines provides you with access to the analytics using a web-based application.
- Analytics VM: this virtual machine is responsible for gathering data from one or multiple vCenter Servers or vCenter Configuration Manager of any other third party data resources.
Licensing
The vCenter Operations Manager comes in four versions:
- Foundation
- Standard
- Advanced
- Enterprise
The license model is either per processor with unlimited virtual machines which is advisable for environments with high consolidation ratio or per virtual machines on physical server which is suitable for environments with low consolidation ratio. Other option is the “a la carte” license which contains a 25 virtual machine instance license pack. More information about licensing can be found on VMware website.
Tip: if you are (re)building or upgrading your infrastructure, consider buying vCenter Operations Manager as part of vCloud Suite or as part of vSphere with Operations Management.
Network Ports
The vCenter Operations Manager uses the following ports for communications. Make sure these ports are open before the deployment on the firewalls.
- Port 22: SSH access to vCenter Operations Manager vApp
- Port 80: redirects to port 443
- Port 443: SSL access to the Admin portal and the application
- Port 1194: tunnel between the UI VM and the Analytics VM
Supported Browsers
At the time of this writing, the vCenter Operations Manager supports the following browsers:
- Internet Explorer 8.0 and 9.0
- Mozilla Firefox 18 and 19
- Google Chrome 24 and 25
- Apple Safari 6
Deploy vCenter Operations Manager
The deployment of vCenter Operations Manager vApp is quite easy and straightforward, it is just basically like deploying any other vApp on you vSphere infrastructure. I assume you already downloaded the OVA file from VMware. In my case I am using version 5.7 which is the latest at the time of this writing.
- Before you begin the deployment, you must configure an IP Pool which will provide network identity to the vApp. The vCenter Operations Manager vApp can then use this IP Pool to automatically provide an IP address to the UI and Analytics VM. Also, the IP Pool facilitates the use of a static IP address during the vApp deployment process.
- Connect to the vCenter Server where you want to deploy the vCenter Operations Manager. In my case I used the vSphere Web Client.
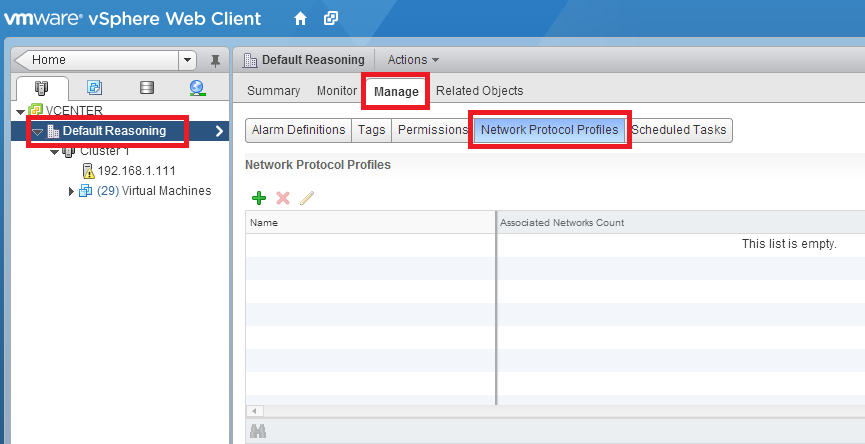
- Navigate to Hosts and Clusters, select the datacenter object, click the Manage tab and select the Network Protocol Profiles (this is the IP Pool tab in the vSphere Client).

- Click the green plus button to create a new profile.
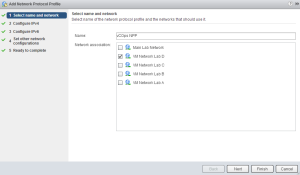
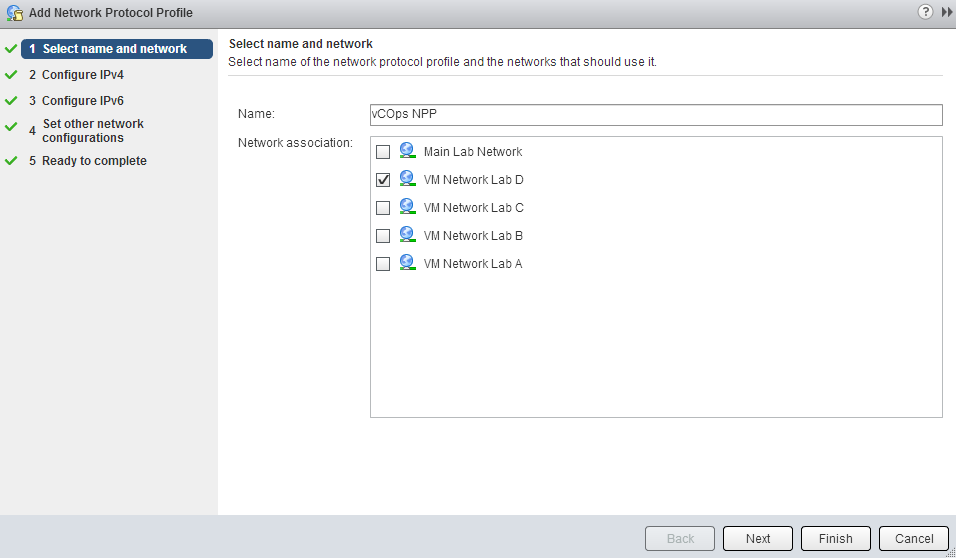
- In the Add New Protocol Profile wizard, provide a name and select a network association from the list.
- Next, specify the subnet, gateway address and DNS servers. DO NOT select the “Enable IP Pool” checkbox and DO NOT specify a range of IP addresses. Those will be specified in the deployment of vCenter Operations Manager vApp.
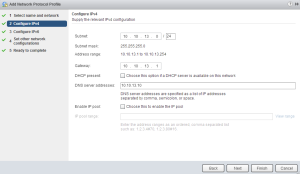
- Enter the DHCP server if there is one available on your network, but in this case it is not necessary. Click Next.
- Leave the IPv6 Configuration and the Other Network Configuration as default.
- Review the settings and click Finish to complete the wizard.
- Now the Network Protocol Profile is created, we can proceed with the vCloud Operations Manager Deployment.
- With the datacenter object still selected, click the Action button and select Deploy OVF Template.
- Select the source and click Next.
- Review the details and click Next.
- Accept the EULA and click Next.
- Provide an intuitive name and select datacenter or folder for the deployed vApp.

- Next, chose the deployment configuration. You can chose from small, medium or large. Each option displays its limits in the window below. Click Next.
- Select a resource in your datacenter and click Next.
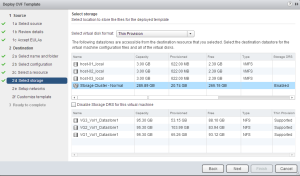
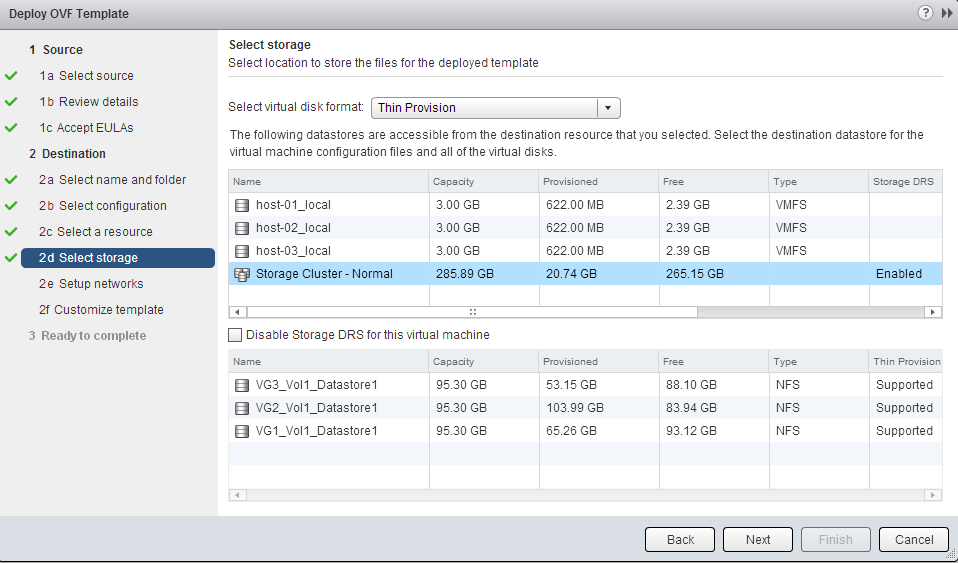
- Select a location on your storage for the files and select the virtual disk format.
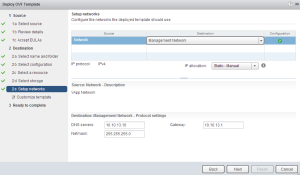
- Next, in the network setup, chose the network destination from the drop-down menu and make sure the IP allocation is set to Static-Manual.
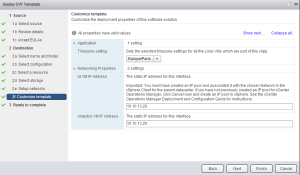
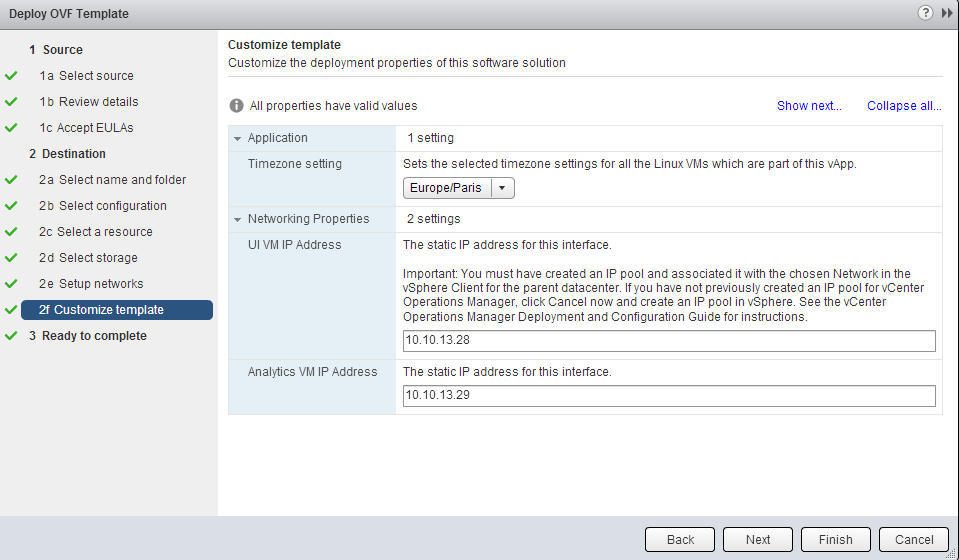
- In the Customize Template window, set the appropriate time zone setting and provide static IP addresses for the UI and the Analytics virtual machines. Click Next.
- Review the settings, select “Power on after deployment” checkbox and click Finish to start the deployment. When it is finished, the vApp and the virtual machines should be powered on.


This concludes the overview and deployment steps for the vCenter Operations Manager. Continue to part 14 where we will configure vCenter Operations Manager for the first time.
Cheers!
– Marek.Z
- vCloud Suite POC Part 1: Introduction
- vCloud Suite POC Part 2: Installing vCloud Director Cell
- vCloud Suite POC Part 3: vCloud Director Configuration
- vCloud Suite POC Part 4: Creating a new Provider vDC
- vCloud Suite POC Part 5: Creating new Organization
- vCloud Suite POC Part 6: Add and Publish Catalogs
- vCloud Suite POC Part 7: Create New vApp
- vCloud Suite POC Part 8: Add vCloud Connector
- vCloud Suite POC Part 9: Move VM to the Cloud
- vCloud Suite POC Part 10: Add vCenter Chargeback Manager
- vCloud Suite POC Part 11: Install and Configure vCenter Chargeback Manager
- vCloud Suite POC Part 12: vCenter Chargeback Manager Cost Analysis and Reporting
Be the first to comment